How EnviroIQ Stopped Wasting Power
The real story of taking EnviroIQ from nearly 100 mA to a 0.42-0.50 mA SEN66-off floor, after Codex and a JouleScope JS220 exposed an unused SX1262 LoRa module that never went to sleep.
EnviroIQ is my air-quality hardware project built around a SimpleAir RevE sensor node: a Nordic nRF54L15 running Zephyr through Nordic’s nRF Connect SDK, a Nordic nPM1300 PMIC and fuel gauge, a 3.52 inch Waveshare e-paper display, Sensirion SHT45 temperature/humidity, Infineon DPS368 pressure, BLE, planned LoRa via Semtech SX1262, supported mmWave presence detection through an Acconeer XM125 radar module, and a Sensirion SEN66 particulate matter sensor that is very good at measuring air and very comfortable taking current from the battery while doing it.
The original power goal sounded simple enough to be dangerous:
Run for more than one year from a 10 Ah LiPo.
That gives a nominal current budget of about 1.14 mA. With realistic derating, aging, cold, regulator loss, and the general personality of batteries, the useful target is closer to 0.57-1.14 mA average. The board did not begin there. It began in the land of “why is this drawing almost a hundred milliamps?” which is a useful place to visit once, briefly, and then leave with evidence.
This is the story of cutting the obvious waste first, then writing the bench tooling that forced the remaining problems to identify themselves. The newest one was the most annoying kind: a radio we were not using was still costing us power.
The work started in Claude Code. The technology was, and still is, genuinely strong. It also became unusable for this bench workflow after repeated false positives treated legitimate local firmware and hardware automation as unapproved vulnerability testing. My experience with Anthropic support made that limitation feel permanent: I had been a Max 20x subscriber from very early on, my application was rejected immediately, and I never received meaningful responses to support requests. That combination is how I ended up moving the active workflow to Codex.
The Win, With Caveats
The successful part of this project is real: the EnviroIQ platform’s SEN66-off floor went from the “something is very wrong” class to the “this can plausibly live on a battery” class.
| Stage | Mean current | What changed |
|---|---|---|
| SEN66 calibrating, no useful PM | ~99 mA | The board was effectively running like a bench demo. |
| SEN66 rail latched on after reset | ~89 mA | Firmware changed, but the PMIC rail remembered the old state. Rude, but educational. |
| BUCK1 forced off at boot | ~9.7 mA | Explicitly turned off the SEN66 rail during PMIC init. |
| PM enabled, SEN66 off | ~3.3 mA | Let the MCU sleep between work instead of idling like it was waiting for a meeting to end. |
| Earlier optimized floor after cadence cleanup | ~1.09 mA | LED, e-ink, sensors, BLE, fuel gauge, and SEN66 duty manager were present, with slower periodic refresh/tick cadence. |
| Release/SEN66-off baseline before SX1262 sleep | ~1.23-1.26 mA | The remaining floor was lower, but still too high. |
| Production SX1262 boot-sleep, post-SEN66 window | 0.421 mA | A verified boot helper put the unused LoRa radio to sleep. |
| Production two-cycle SEN66-off composite | 0.497 mA | Full production workload with SEN66 high-current windows removed. |
That is roughly a 235x reduction from the ugly early bench number to the best final post-SEN66 idle window. If you use the production two-cycle SEN66-off composite instead, it is still about a 199x reduction. This is the point where the non-SEN66 platform waste stopped being the main story.
The caveat matters: the SEN66-off floor is not the same thing as the whole product duty cycle. The current production SEN66 policy still averages 4.565727 mA over steady cycles because each 45 second SEN66 event costs about 1.08 mAh. On a nominal 10 Ah battery, that is about 91.3 days load-only. Without the SEN66 high-current windows, the same production workload averages 0.497099 mA, which is about 838 days load-only. So the platform waste was dramatically reduced, and the remaining battery-life decision moved up a layer: how often should EnviroIQ run the SEN66, and what air-quality fidelity is worth that current?
That is the kind of success I trust. Not “we fixed everything.” More like: “we removed the nonsense, found a radio quietly staying awake, and now the hard problem is finally standing in the center of the room holding a name tag.”
js220 evidence
The Power Story
One trace explains the update: the SEN66 owns the active window, and the unused SX1262 was the hidden idle-floor problem.
Floor Reduction
10 Ah Runtime
The System
The firmware lives in simpleair-ncs, the Nordic nRF Connect SDK version of the SimpleAir firmware. The board target is simpleair_reve/nrf54l15/cpuapp. The public-facing product name is EnviroIQ, but the firmware and docs still use the SimpleAir naming because hardware projects enjoy having at least three names for every object.
The PCB was designed in KiCad, manufactured by JLCPCB, and assembled in-house on a LumenPNP pick-and-place machine. Reflow happened here too, using a Whizoo ready-to-run reflow oven, which was honestly amazing. So the software story sits on top of a very real hardware story: design, placement, reflow, bring-up, measurement, and all the small bench rituals in between.
Quick disclosure because this post mentions several real tools by name: none of this is sponsored. I bought the JS220, LumenPNP, reflow oven, parts, boards, and bench gear at normal retail prices with my own money. When I say the JouleScope JS220, LumenPNP, and Whizoo reflow oven are excellent, that is not an ad read. It is the much less glamorous version: I paid for them, used them hard, and they earned the praise.
The important power actors were:
| Block | Why it mattered |
|---|---|
| nRF54L15 | Main MCU, BLE controller, Zephyr/NCS runtime. |
| nPM1300 | PMIC, battery charger, regulators, fuel-gauge current reporting. |
| SEN66 | Air-quality sensor with fan/laser/current spikes; dominant load. |
| E-ink display | Low average when asleep, easy to falsely blame because “display” sounds guilty. |
| XM125 mmWave radar | Presence-detection path supported and built; not yet part of the optimized JS220 power profile. |
| BLE | Connectivity path to gateway and app tooling. |
| SX1262/LoRa | Planned long-range transport; the unused RevE module became the surprise sleep-state bug. |
| Gateway | ESP32-C6 bridge for BLE/LoRa, Home Assistant integration, and OTA workflows. |
The XM125 deserves a footnote because it is easy to accidentally erase from the story. Presence detection is supported and built, and the product direction is interrupt-driven, power-efficient mmWave presence in RevF. This post does not claim the radar’s power profile is optimized yet; the JS220 work here focused on the main EnviroIQ sensor firmware and the SEN66-dominated duty cycle.
The gateway side matters because EnviroIQ is not just a sensor blinking alone in a corner. It is part of a sensor/gateway/Home Assistant chain. The power loop eventually sat next to gateway and OTA work, and the broader bench automation direction included agent control over both sensor and gateway firmware. That broader context comes from bench/operator notes; the durable power evidence in this post comes from the sensor-side JS220 captures and the JouleScope MCP tooling.
The Bench, In Pictures
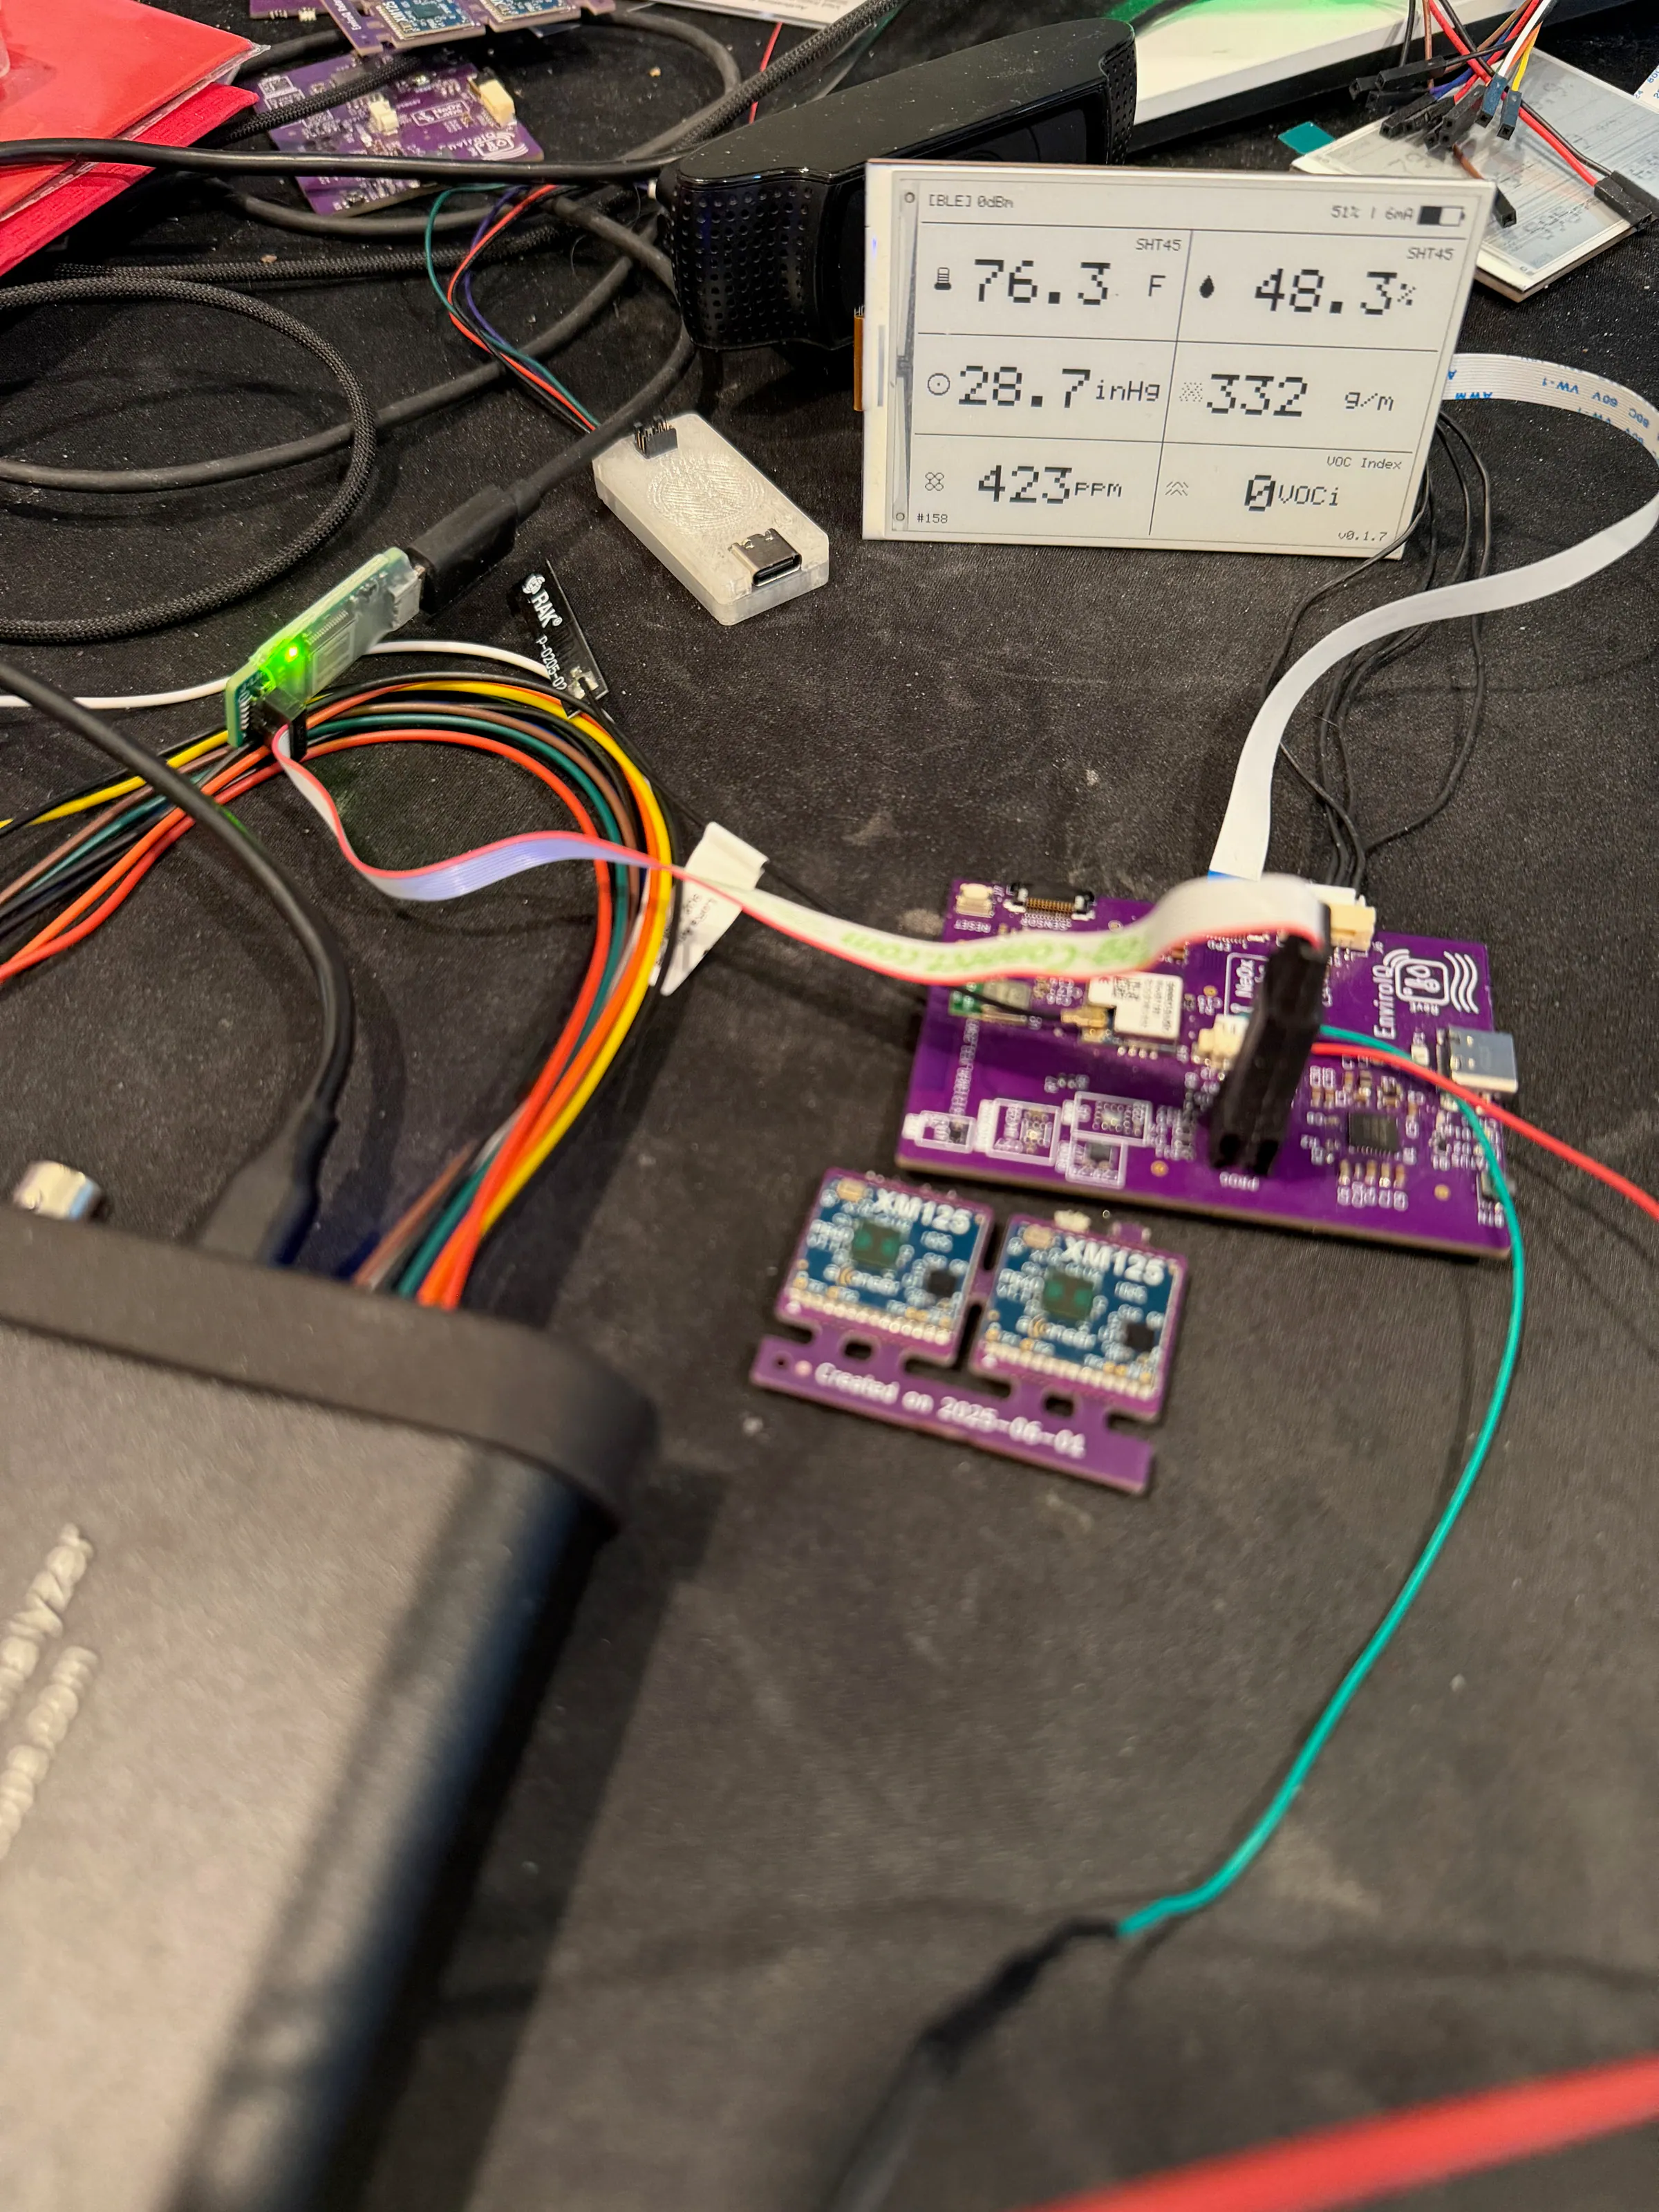
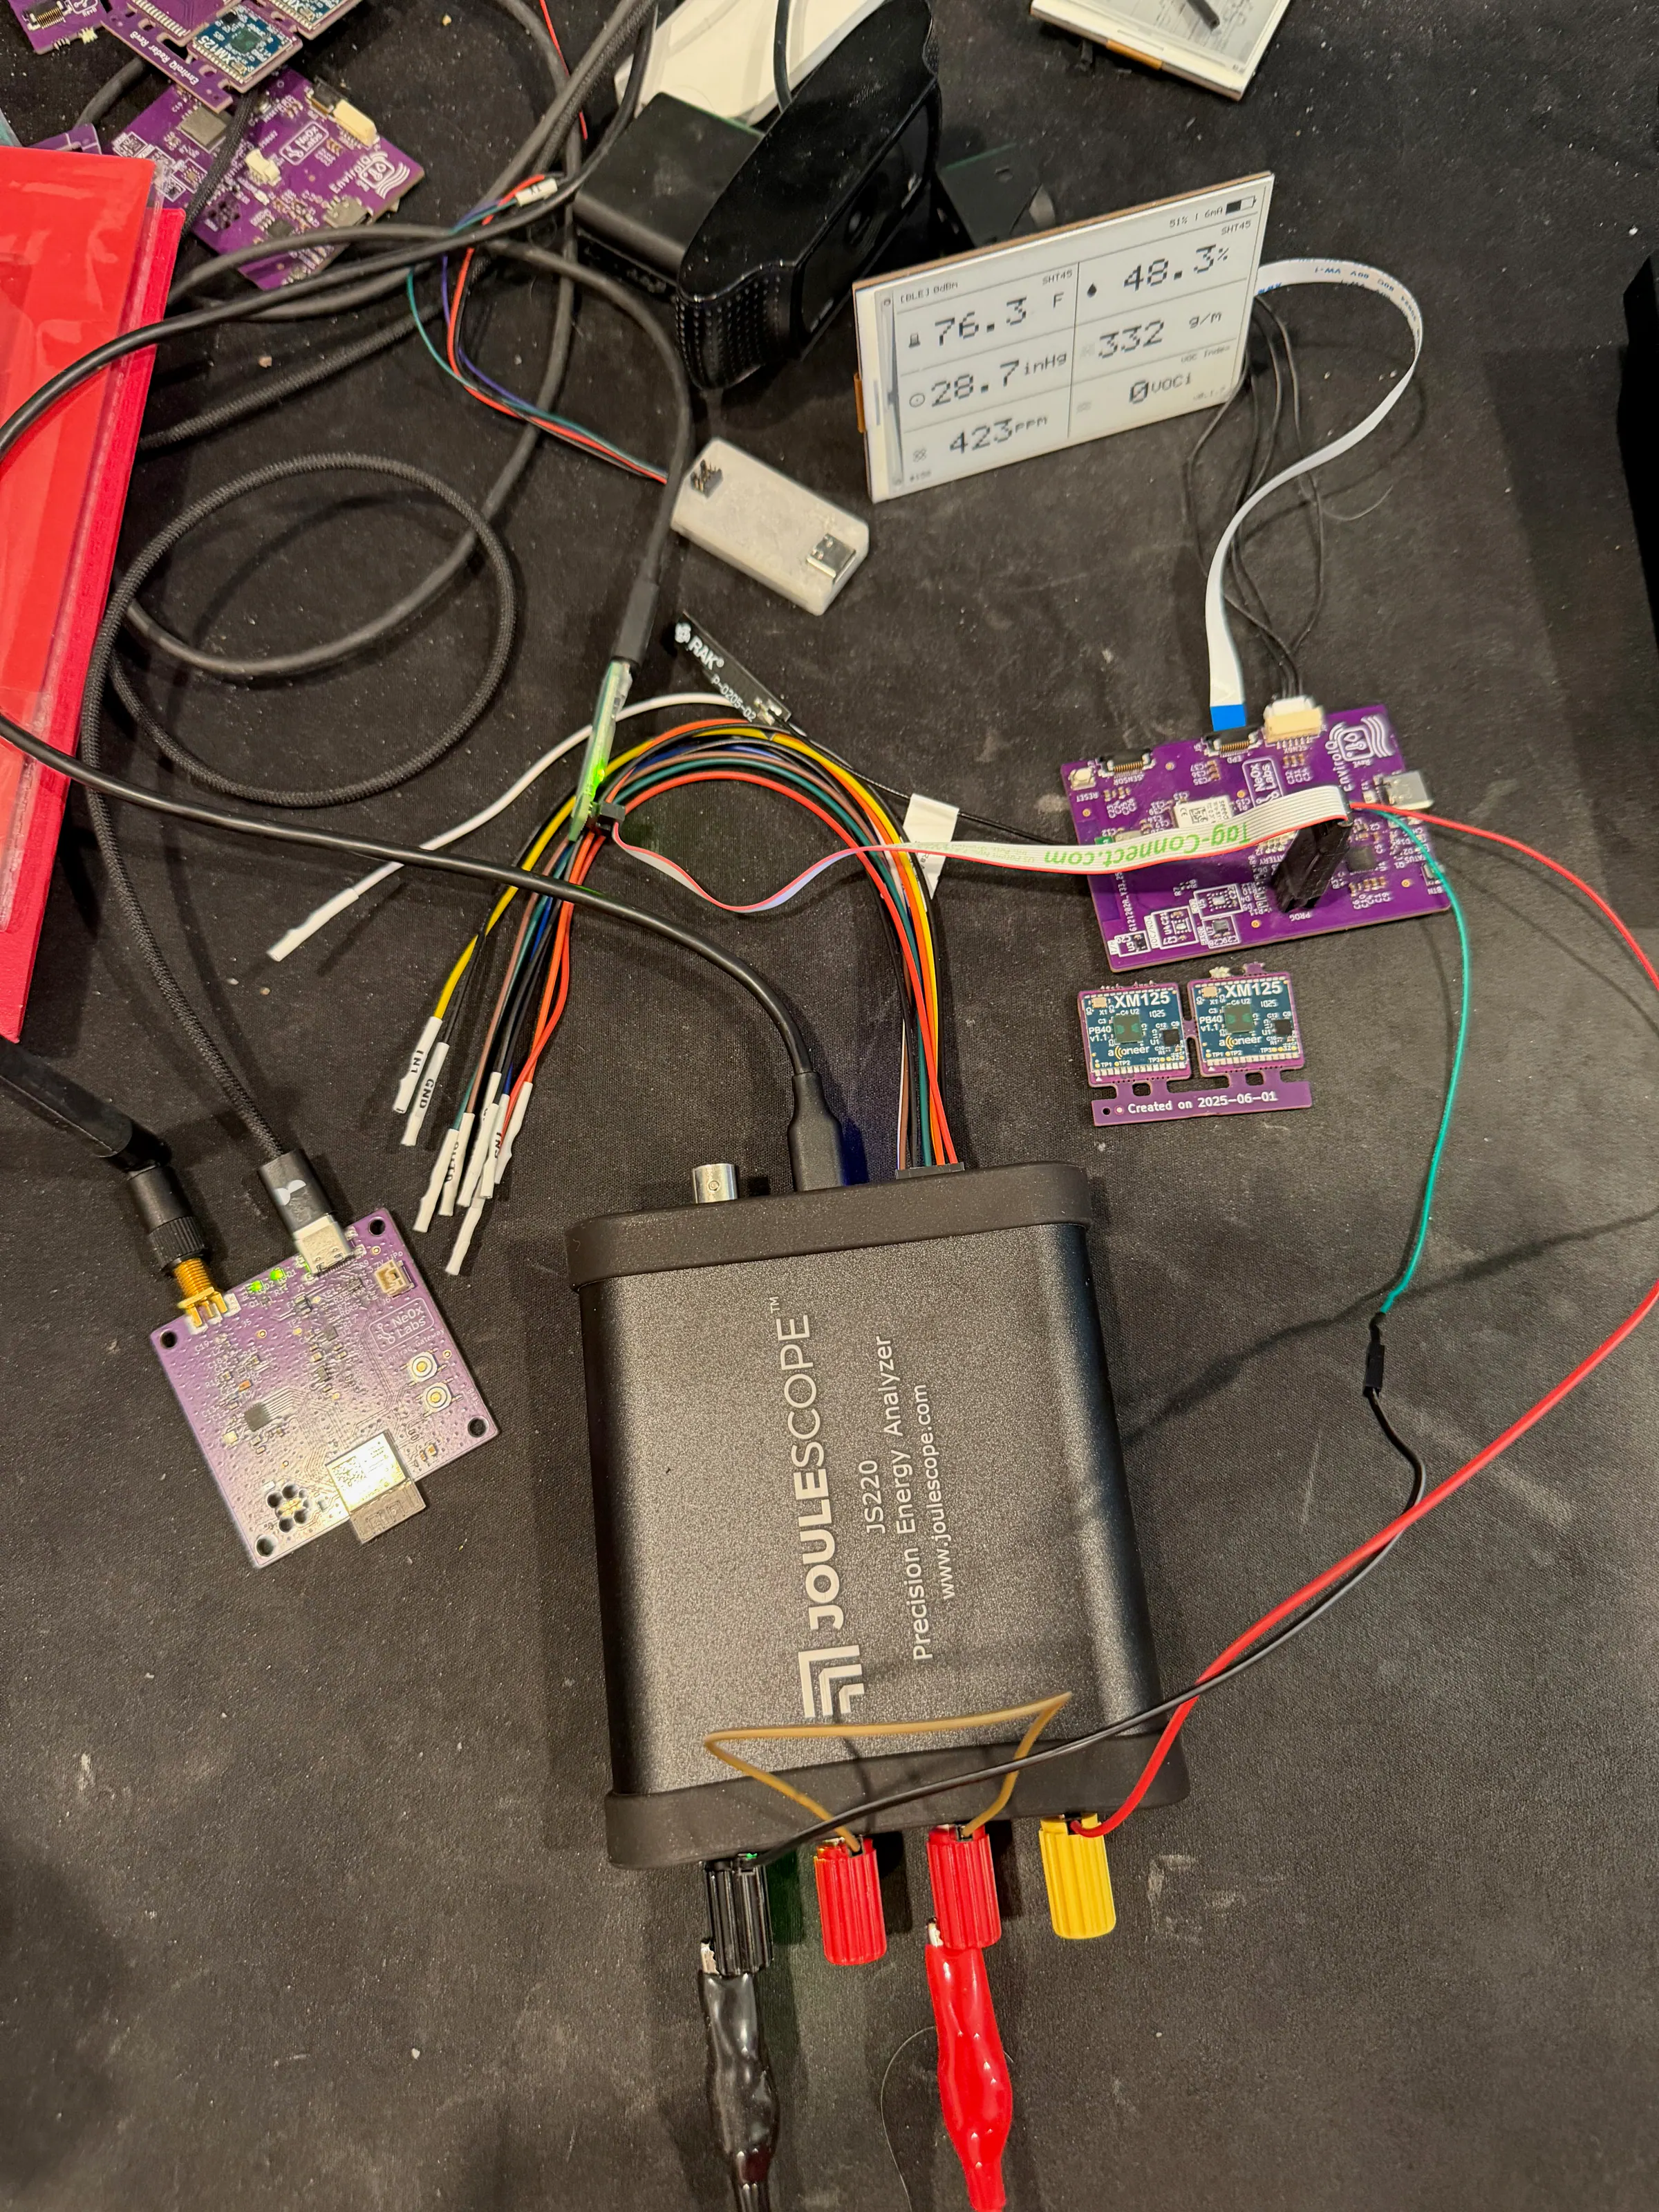
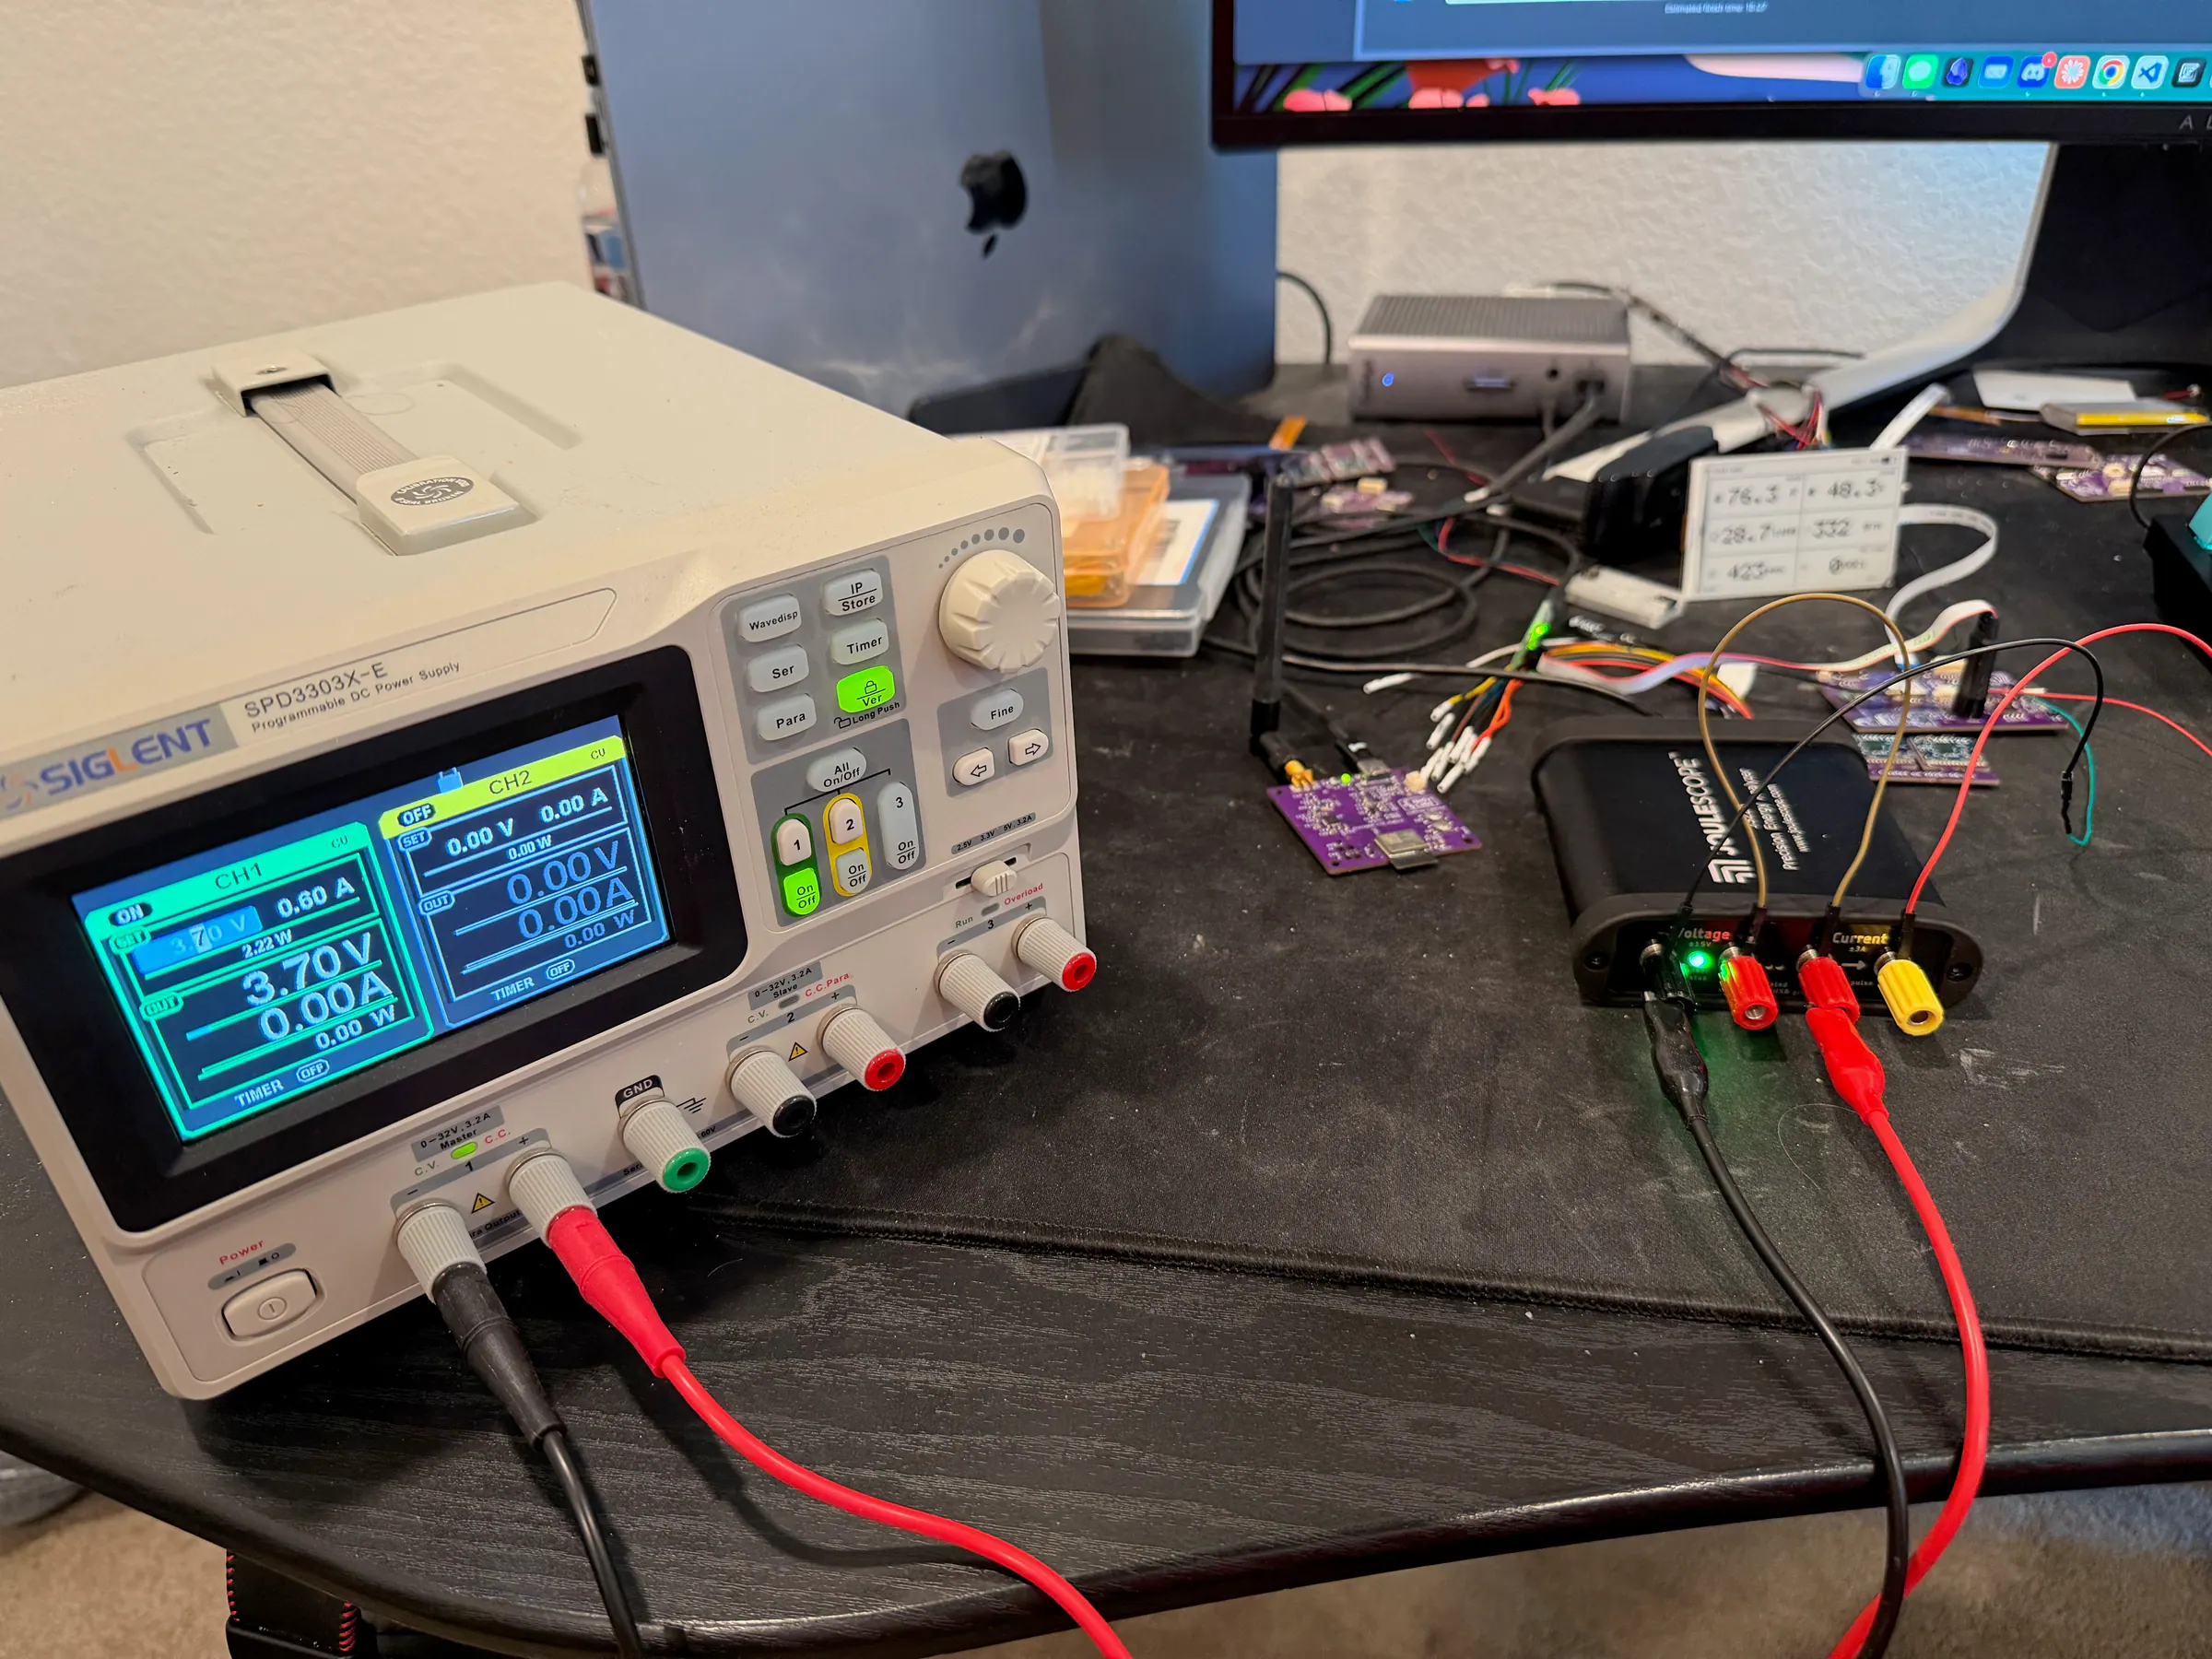
This was not a spreadsheet-only exercise. The setup had the usual bench reality: purple boards, ribbon cables, a live e-ink panel, a JS220 in the current path, and enough labeled jumpers to make future me slightly less annoyed.
Also: apologies for the photo quality and the state of the bench. The electronics bench is still very much under construction, which is a polite way of saying the hardware worked before the room did.
The First Wrong Model
The first research journal started with a reasonable suspicion list:
- Debug builds had power management disabled.
- The SEN66 rail might not be off when we thought it was.
- The e-ink display might be held powered.
- The debugger might keep the MCU from sleeping.
- The nPM1300 current readings might be polluted by the act of reading them.
All of those were plausible. Some were true. Some were false in useful ways.
The early data was dramatic, and this is where the success story really starts:
| Configuration | Mean current | Practical read |
|---|---|---|
| SEN66 calibrating, no PM | ~99 mA | Battery life measured in days. Excellent only if the product is a trade-show demo. |
| ”No calibration”, but BUCK1 latched on | ~89 mA | The firmware changed; the PMIC rail did not. |
| BUCK1 forced off at boot, no PM | ~9.7 mA | The first real low-power-ish baseline. About 10x better than the start. |
| BUCK1 off, PM enabled | ~3.3 mA | Kernel sleep and runtime PM removed another ~6.4 mA. |
| Useful sleep-window config after cadence cleanup | ~1.09 mA | The board finally crossed the nominal one-year sleep-window budget. |
The key lesson was not subtle: rail state survives assumptions. The nPM1300 BUCK1 regulator feeding the SEN66 could stay enabled across MCU reset. A firmware image with the duty manager disabled did not automatically mean the sensor rail was off. The board was not being mysterious. It was doing exactly what the power hardware had been told to do earlier.
The fix was to explicitly force BUCK1/SEN66 power off during PMIC initialization. After that, the measurements started making sense. This was the first major win: not a clever algorithm, not a heroic rewrite, just refusing to let a retained regulator state quietly burn the battery.
The second major win was enabling the PM path correctly and fixing the flashing workflow that had made PM look broken. The firmware had appeared to fault when CONFIG_PM was enabled, but the real problem was a flash/programming issue. Once that was corrected, the same board dropped from roughly 9.7 mA to roughly 3.3 mA.
Then the work got more subtle. Several suspects did not pay out:
| Suspect | Result |
|---|---|
| E-ink held continuously active | Not the main load when initialized correctly. Disabling the driver incorrectly made things worse because the panel pins floated. |
| BLE advertising | Much smaller than feared at slow advertising cadence. |
| Sensor polling | Real, but not the giant mA-class leak. |
| Debug probe | Important for methodology, but not the explanation for the whole floor in the validated runs. |
The important lesson was that power optimization is a detective story where most suspects are innocent, and a few are guilty in ways that are annoying but useful.
The Measurement Problem
Power optimization fails quickly when the measurement setup changes the thing being measured.
There were three problems:
- The nPM1300 fuel-gauge current value is read over I2C, which wakes the MCU.
- A connected SWD/J-Link debug probe can keep debug domains alive and alter sleep behavior.
- The early on-board current readings were useful for relative movement, but not trustworthy as absolute truth below the low-milliamp range.
The first problem turned out to be manageable. Sparse readings were enough to show relative direction. The second problem required discipline: build, flash, detach the probe when needed, power-cycle through the measurement instrument, capture, then reattach only after the measurement window. The third problem forced a tooling upgrade: a high-rate external source-meter showed the on-board current register was under-reading by about 41% in one low-load configuration.
That became the working protocol. It is boring. Boring is good. Boring is how you keep a battery-life claim from being a horoscope.
The source-meter work also produced one of the most useful non-firmware artifacts: a small persistent control service. One-shot scripts were not enough because the instrument dropped DUT power when the host connection closed. Keeping the connection open made repeated captures reliable. That pattern later carried directly into the JS220 MCP work: the agent should not merely ask for measurements; it needs a measurement service that preserves bench state across calls.
The Best Firmware Wins
The biggest changes were not exotic. They were the kind of changes that sound obvious only after a current trace makes them unavoidable.
| Change | Why it mattered |
|---|---|
| Force SEN66 BUCK1 off at boot | Prevented a retained PMIC rail state from keeping the SEN66 powered after reset. |
| Fix the PM build/flash path | Let the MCU actually sleep instead of burning through the battery at a no-PM floor. |
| Slow the e-ink forced refresh cadence | Deep-sleep wake required a full reset/init/LUT load, so refreshing every 10 s was expensive. Moving toward 120 s preserved usefulness and saved hundreds of microamps. |
| Slow fuel-gauge work | Fewer PMIC/I2C/floating-point fuel-gauge events reduced wake energy. |
| Reprobe SEN66 after powering its rail | Fixed a real ordering bug where the driver probed while BUCK1 was off and then cached “not present.” |
The e-ink result is my favorite because it is exactly the kind of bug that hides behind good intentions. The driver was correctly putting the panel to deep sleep after refresh. That is good. But the app was also forcing a periodic refresh every 10 seconds even when nothing meaningful had changed. Waking from deep sleep required roughly 700 ms of reset, init, and LUT loading. The display was not wasting energy by existing; the policy was waking it up to ask if it was still a display.
Changing the forced refresh interval from 10 s to 30 s, then to 120 s, plus slowing the fuel-gauge cadence, took the useful sleep-window current from around 1.49 mA to 1.09 mA. A repeat run measured 1.0885 mA, essentially identical to the first 1.0888 mA result. That is the point where the budget hit became credible instead of lucky.
Adding The JS220
The JouleScope JS220 changed the work from “read logs and hope” to “measure charge and energy over a real interval.” The important part is that we did not leave it as a manual bench instrument. We wrote joulescope-mcp, a public Model Context Protocol server that gives an agent direct access to JS220 measurements and target-power control.
The power audit used a JS220 with firmware 1.3.0, FPGA 1.3.3, and the Python JouleScope driver behind that MCP server. The primary tool was measure_energy: give it a duration and interval, get back total charge, total energy, average current, average power, voltage, and per-bin samples. Another tool could cycle target power through the JS220 current path, which meant Codex could start each run from a known electrical state instead of asking me to poke the bench every few minutes like a very expensive metronome.
That gave the agent a clean loop:
Agent measurement loop
Only count progress after the firmware builds, flashes, power-cycles, measures, saves artifacts, and beats the previous run.
Build firmware variant
Flash with verification
Cycle target power through JS220
Capture current, power, charge, and energy
Save JSON and CSV artifacts
Compare against the prior run
Change one thing
Repeat
The measurement helpers saved compact summaries and CSV traces in the private firmware repository. When MCP transport limits got in the way, the same JS220 service backend was called directly from Python. Later, the MCP timeout was raised and the hosted tool path successfully completed near-5-minute measurements, including a scheduled SEN66 event capture through the MCP path.
That matters because “agent optimizes firmware” is otherwise too easy to fake. The useful version is narrower and more demanding: the agent can only claim progress when the instrument says the charge changed.
The MCP Server
The MCP server is github.com/juanqui/joulescope-mcp. We wrote it so Codex could operate the JS220 autonomously instead of treating power measurement as a manual side channel.
| Tool shape | Use |
|---|---|
list_devices | Confirm the JS220 is visible. |
target_power_status | Check whether the target current path is on and autoranged. |
cycle_target_power | Disconnect/reconnect DUT current path for repeatable boot captures. |
measure_energy | Capture current, voltage, power, charge, and energy over a time window. |
read_gpi | Read JS220 GPI pins for future marker-synchronized captures. |
This is the point where the setup stopped being “an AI looks at firmware” and became a bench automation loop. Codex could inspect the code, modify firmware, build the board, use the JS220, and then decide whether the change helped. In later bench workflows, this direction extended toward coordinating gateway and sensor firmware together, and using visual confirmation of the e-ink display. For this post, I am keeping the hard claims tied to the JS220 artifacts because those are the receipts.
The LoRa Module We Were Not Using
The most important recent finding was not BLE, the MCU, the display, or the environmental sensors. It was the Semtech SX1262 LoRa module.
Production firmware was not sending SetSleep to the SX1262 at all.
The reason was painfully reasonable:
- RevE has LoRa disabled.
CONFIG_LORA=n.- The
lora0driver path is not active. - The normal Zephyr SX1262 driver is therefore never initialized.
- Because the driver never runs, it never sends
SetSleep. - The SX1262 module is on the always-on main rail, so the radio can sit powered even when unused.
That is exactly the kind of bug a current trace is good at finding. A code review can miss it because the firmware is “correctly” not using LoRa. The battery does not care that the software architecture has an elegant explanation.
The first raw SetSleep experiment was not good enough. It sent the command, but it did not prove the SX1262 actually responded. The JS220 trace showed essentially no current change after that command, so we could not claim success.
We corrected the test by verifying the SX1262 command path first:
| Verification step | Result |
|---|---|
GetStatus after reset | 0x2a |
| Read LoRa SyncWord | 0x1424 |
| Write test SyncWord | 0xabcd |
| Read back test SyncWord | 0xabcd |
| Restore original SyncWord | Successful |
Send SetSleep | Sent only after the command path was proven |
That was the critical difference: we stopped treating “we sent bytes over SPI” as proof and started requiring a real SX1262 read/write response.
The production fix had to be weird because RevE cannot simply enable the normal SX1262 SPI device in the production build. The environmental sensors use i2c21; the SX1262 would use spi21; on this nRF54L15 configuration, those collide. Enabling spi21 for the LoRa module would break the production sensor bus.
So the workaround does not enable the normal LoRa driver. It uses a small GPIO bit-banged SPI helper at boot:
- Keep
i2c21enabled for SHT45, DPS368, and SEN66. - Keep
spi21disabled. - Use GPIO-only bit-banged access to the physical SX1262 pins.
- Prove the SX1262 responds.
- Send
SetSleep. - Continue booting the normal production image.
That let the full production build run with LED task, e-ink, SHT45, DPS368, SEN66 duty cycling, BLE, release logging/RTT disabled, and the unused SX1262 put to sleep at boot.
The before/after was not subtle:
| Measurement | Description | Current |
|---|---|---|
| Earlier corrected post-boot nominal | Production-like, SEN66 off, before SX1262 boot sleep | 1.259 mA |
| Release post-boot idle | Release build, before final SX1262 boot-sleep validation | 1.229 mA |
| Final SX1262 boot-sleep release | Post-SEN66 sleep window, 70-185 s | 0.421386 mA |
| Final 2-cycle production trace | SEN66-off composite, high-current windows removed | 0.497099 mA |
The final release-layered SX1262 boot-sleep capture showed the shape that matters:
| Window | Mean current |
|---|---|
| 0-10 s boot | 1.582914 mA |
| 11-56 s SEN66 high-current cluster | 81.037747 mA |
| 57-62 s transition | 0.632919 mA |
| 70-120 s post-sleep | 0.386916 mA |
| 120-185 s post-sleep | 0.447901 mA |
| 70-185 s post-sleep | 0.421386 mA |
The transition after the SEN66 stop is the chart I would use if I had to explain the whole update in one picture:
| Time | Current |
|---|---|
| 55 s | 59.682321 mA |
| 56 s | 8.699489 mA |
| 57 s | 1.537355 mA |
| 58 s | 0.295882 mA |
| 59 s | 0.402034 mA |
| 60 s | 0.631013 mA |
| 61 s | 0.298311 mA |
| 62 s | 0.303215 mA |
The hero chart at the top of this post is a simplified version of that final JS220 capture: SEN66 high current, then a sharp drop into the sub-milliamp floor after the SEN66 powers down and the SX1262 has been put to sleep.
Prompts That Shaped The Loop
These samples are cleaned from the real Claude Code and Codex histories. I removed local paths, repeated context dumps, typos, secrets, and tool-specific noise, but kept the actual intent and constraints. The raw history is useful to me; it is not suitable for publication.
Start the power loop
Turn a one-year battery target into a measured firmware research loop.
Build and test lower-power firmware support for the RevE sensor. The goal is more than one year of battery life from the installed LiPo.

First understand the hardware and every powered component. Review the device docs, backfill missing power-management sections from datasheets, cite primary sources, and then run an iterative measurement loop.

Triple-check assumptions and keep a dated journal.Continue an empirical iteration
Force each loop to pick up from the journal and preserve closed evidence.
Continue the power-optimization research loop.

Read the journal, find the next pending iteration, execute it under the research-loop rules, load the relevant hardware/tooling skills, capture verbatim measurements, cite primary sources, append the result, and do not rewrite closed iterations.Fix the power instrument workflow
Move from one-shot CLI captures to a persistent instrument service.
The power profiler is wired to the battery input, which is the true current path we care about.

The CLI command appears to work, but the device loses power when the tool disconnects. Build a small server that keeps the instrument connection open, exposes status and capture commands, and test it until the power source is reliable enough for autonomous profiling.Build the JS220 MCP server
Expose charge, energy, current, voltage, and power control as agent-callable tools.
Create a robust MCP server for the JouleScope JS220.

Expose agent-friendly tools for measuring total charge and energy over a requested duration, with configurable accumulation intervals. Include current, voltage, power, charge, energy, target-power control, and enough interval samples for an agent to compare firmware variants honestly.Run the Codex power audit
Make the agent power-cycle the board, capture boot and idle behavior, and trace the SEN66 load.
Use the JouleScope JS220 MCP to measure exact power consumption of the hardware.

Power-cycle the device through the JS220 current path, capture the full boot cycle multiple times, study nominal fully booted current, trace every sensor and operation, especially the SEN66, and write a power-consumption audit report.Make the bench visible
Use the camera and real e-ink panel as part of the acceptance test.
Use the camera pointed at the e-ink display to verify the UI, not just the logs.

The display should make it obvious when an OTA is in progress. Redesign the screen until it is legible, polished, and validated visually on the real panel.
What The JS220 Data Added
The earlier loop proved we could remove platform waste. The JS220 loop answered the next question: after the board is no longer doing silly things, what still owns the battery?
The updated answer is two-part:
- The unused SX1262 was keeping the SEN66-off floor too high.
- After that was fixed, the current SEN66 duty cycle became the dominant load again.
The key production results now look like this:
| Scenario | Measured average current | 10 Ah battery estimate |
|---|---|---|
| Production firmware, current SEN66 duty cycle | 4.565727 mA | 91.3 days |
| Production workload with SEN66 high-current windows removed | 0.497099 mA | 838.2 days |
| Stable SEN66-off interval only | 0.470735 mA | 885.1 days |
| Earlier release/SEN66-off baseline before SX1262 boot sleep | ~1.23-1.26 mA | ~330-340 days |
| Final SX1262 boot-sleep post-SEN66 idle window | 0.421386 mA | ~989 days load-only |
That is the whole plot. The board can sit below half a milliamp between SEN66 events, but every roughly 15 minute cycle it runs a high-current SEN66 measurement long enough to dominate the average.
The current production SEN66 configuration is:
| Setting | Value |
|---|---|
| SEN66 duty cycle enabled | yes |
| Warmup duration | 45 s |
| Measurement interval setting | 900 s |
| Effective warmup-start spacing observed | ~946 s |
| Reason | The 900 s timer starts after measurement/stop/power-off, not from warmup start. |
The 2050 s JS220 production trace captured three repeatable SEN66 events:
| Event | Time window | Duration | Avg current | Max current | Charge |
|---|---|---|---|---|---|
| Boot SEN66 event | 11-56 s | 45 s | 84.381385 mA | 125.127605 mA | 1.054767 mAh |
| Scheduled SEN66 event 1 | 958-1003 s | 45 s | 87.014719 mA | 129.601989 mA | 1.087684 mAh |
| Scheduled SEN66 event 2 | 1904-1949 s | 45 s | 86.098428 mA | 126.916639 mA | 1.076230 mAh |
The steady cycle windows are the number I now trust most for the current product behavior:
| Window | Duration | Avg current | Charge |
|---|---|---|---|
| Event 1 + following idle | 946 s | 4.587521 mA | 1.205498 mAh |
| Idle + event 2 | 946 s | 4.543934 mA | 1.194045 mAh |
| Average of the two | 946 s | 4.565727 mA | ~1.199772 mAh |
The SEN66 dominates the power budget. Each scheduled event costs about 1.08 mAh in 45 seconds. At the current 15-minute-ish cadence, that alone adds roughly 4.1 mA of average current.
The JS220 loop also killed several tempting villains:
| Suspect | Result |
|---|---|
| E-ink display software rendering | Not the material idle cost. The display mattered less than expected compared with SEN66 and the unused SX1262 state. |
| BLE advertising/controller overhead | The suspected multi-minute BLE connection problem did not reproduce after flashing the current gateway build. |
| Fuel-gauge work | Cadence mattered for the optimized sleep window, but it could not erase the SEN66 duty-cycle cost. |
| SHT45/DPS368 reads | Bounded small compared with SEN66. |
| Debug probe | Detached/probe-related checks did not explain the milliamp floor. The SX1262 and SEN66 conclusions are not just probe artifacts. |
One BLE detail is worth calling out because it removed a false lead. After the current gateway build was flashed, the sensor connected quickly:
| Event | Sensor uptime |
|---|---|
| BLE advertising started | 2.729 s |
| BLE connected | 2.734 s |
comm_manager connected to gateway | 2.829 s |
| TX notifications enabled | 3.836 s |
| DEVICE_BOOT sent via BLE | 3.969 s |
The long connection delay was likely stale gateway firmware/state or a bench setup issue, not a proven current sensor firmware bug.
This is why the post title is not “I turned off BLE and saved the planet.” BLE was not the main load. BLE was a paperclip on the floor.
Battery Forecast
The 10 Ah pack sounds enormous until the duty cycle gets a vote.
The simple load-only formula is:
runtime_days = usable_capacity_mAh / average_current_mA / 24There are now three honest battery-life stories:
| Model | Current | Practical meaning |
|---|---|---|
| Best final post-SEN66 idle window | 0.421386 mA | The SX1262 sleep fix proved the sub-half-milliamp floor was reachable. |
| Production SEN66-off composite | 0.497099 mA | The production workload is now low enough for a one-year load-only target when SEN66 high-current windows are removed. |
| Current production SEN66 duty cycle | 4.565727 mA | The air-quality policy dominates the deployed average. |
Load-only estimates:
| Scenario | Average current | 10,000 mAh | 9,000 mAh | 8,000 mAh | 7,000 mAh | 5,000 mAh |
|---|---|---|---|---|---|---|
| Production, current SEN66 duty cycle | 4.565727 mA | 91.3 d | 82.1 d | 73.0 d | 63.9 d | 45.6 d |
| Production, SEN66 high-current windows removed | 0.497099 mA | 838.2 d | 754.4 d | 670.6 d | 586.7 d | 419.1 d |
| Stable SEN66-off interval only | 0.470735 mA | 885.1 d | 796.6 d | 708.1 d | 619.6 d | 442.6 d |
Planning estimates with a simple 3%/month self-discharge equivalent:
| Scenario | Capacity model | Self-discharge equivalent | Runtime |
|---|---|---|---|
| With SEN66 | 10,000 mAh nominal | 0.410678 mA | 83.7 d |
| With SEN66 | 8,000 mAh usable | 0.328542 mA | 68.1 d |
| Without SEN66 high-current windows | 10,000 mAh nominal | 0.410678 mA | 459.0 d |
| Without SEN66 high-current windows | 8,000 mAh usable | 0.328542 mA | 403.7 d |
That is not a one-year sensor at the current SEN66 cadence. It is also not a failure. It means the waste was removed successfully, and the remaining gap is not mysterious leakage. It is the product asking for a 45 second, roughly 86 mA measurement every 15 minutes-ish. The sensor is doing what it was told. The battery is simply filing a formal complaint.
A 10 Ah battery over one year allows:
10000 mAh / 365.25 days / 24 h = 1.141 mA averageWith the current non-SEN66 floor of 0.497 mA, the remaining load-only budget for SEN66 is about:
1.141 mA - 0.497 mA = 0.644 mAAt about 1.08 mAh per SEN66 event, that implies:
| Model | Required SEN66 event spacing for ~1 year |
|---|---|
| 10 Ah load-only | ~1.7 hours |
| 10 Ah + 3%/month self-discharge | ~4.6 hours |
| 8 Ah usable + 3%/month self-discharge | ~12.4 hours |
The path to one year is now concrete enough to be uncomfortable: the SEN66 policy has to change, or the product has to accept a shorter runtime. Firmware idle cleanup helped a lot, but it cannot erase a 45 second high-current sensor event every 15 minutes. The optimization target moved from “find random leakage” to “choose the sensing schedule, sensor mode, or air-quality requirements honestly.”
The Part I Liked Most
The most useful artifact was not a single current number. It was the workflow:
- The agent had steering that required evidence, limitations, and saved artifacts.
- Firmware changes were built and flashed rather than merely proposed.
- The JS220 controlled the DUT current path and measured charge/energy.
- Scripts wrote machine-readable summaries and raw-ish CSV traces.
- Review gates checked whether the evidence set was complete.
That made Codex less like a chatbot and more like a patient lab assistant with a compiler, an ammeter, and no instinct for lunch breaks.
The loop still had limits. The JS220 GPI marker capture was prepared but not physically completed in the current bench setup, so exact hardware-edge synchronization is still missing. The audit records that as an explicit limitation instead of pretending the retained RAM trace and current bins are the same thing. They are not.
The Public Audit Report
The full JS220 power audit is now public as a GitHub Gist: SimpleAir Power Consumption Audit.
That document is the long-form version of this post’s evidence. It records the SimpleAir RevE board powered through the JS220 current path, the JS220 firmware/FPGA versions, the firmware revision under test, the measurement methodology, the retained RAM event trace, the whole-duty-period validations, the detached-probe pass, and the remaining physical limitations.
It was assembled with Codex’s new /goal workflow. I gave Codex a long-running objective instead of a single prompt: finish the power audit, keep measuring until the evidence was internally consistent, write down the limitations instead of smoothing them over, and stop only when the report could stand on its own. That run took roughly 12 hours. Most of that time was not glamorous. It was build, flash, power-cycle, measure, inspect the trace, notice a bad assumption, patch the helper, repeat. Exactly the kind of work that benefits from an agent with access to the instrument and very little interest in pretending a partial capture is a conclusion.
The important thing is that the gist gives readers a place to inspect the actual audit narrative instead of asking them to trust a private repo path. The raw JSON and CSV captures still need a sanitized public bundle, but the report itself is no longer trapped on my machine.
What Comes Next
The next useful experiments are product-level, not polish-level:
- Test longer SEN66 intervals and quantify how air-quality usefulness degrades.
- Evaluate event-triggered or adaptive sampling instead of a fixed 15 minute cadence.
- Run the same JS220-backed optimization loop for the supported XM125 mmWave presence path, especially the RevF interrupt-driven power profile.
- Add a real JS220 GPI marker capture when the bench wiring is available.
- Decide which raw measurement artifacts should be published with future posts.
- Keep the agent loop, but make it argue from charge and energy, not vibes.
The board is not done. The process, however, is much better now. It can tell us when the battery story is real, when it is wishful thinking, and when the sensor is simply doing exactly what we asked, at 90 mA, for 46 seconds, again.
Evidence Status
The JouleScope MCP server is public at github.com/juanqui/joulescope-mcp, and the complete JS220 audit report is public at gist.github.com/juanqui/298cfce644affc80458989effcd3a55e. That is now the reader-facing evidence trail for the measurements discussed here.
The next evidence step is a sanitized artifact bundle with:
- JS220 summary JSON for the boot, nominal, 930 s duty-period, 2000 s multi-duty, BLE A/B, and detached-probe runs.
- CSV samples for at least the representative boot, nominal, and duty-period captures.
- Sanitized high-rate source-meter summaries for the 1.09 mA optimization loop.
- The scripts used to normalize captures and compute the forecast.
- A short manifest explaining firmware revision, instrument version, target-power wiring, probe state, and known limitations.
- Redactions for local absolute paths, serials if desired, account details, private network addresses, and any credentials from agent history.
Until that bundle exists, the honest reader-facing citation is: the audit report is public and instrument-backed, while the underlying raw JSON/CSV artifact set is not public yet.